:rotate(0)/4vak3w14u05cp2adek22clelc2ua)
Using the NuVu Platform
Student will use the NuVu Studio Management Platform for all documentation and presentation over the course of the studio. Student Documentation is important to NuVu’s Studios as it creates a clear trace of the development of projects and understanding of students’ processes. Documentation helps students to internalize the iterative nature of the design process through self-awareness and reflection on their constantly refining their ideas and prototypes while receiving and synthesizing feedback from Coaches and experts.
Documentation (via blog posts on the NuVu Studio Management Platform) includes posting and labeling scans of sketches, posting of precedents, and photographs of current stages of design. Periodic summary posts require students to synthesize and document their progress through an analysis of their work culminating in a clear statement of your direction for the project. Students are encouraged to reflect on their own work and coach feedback, synthesize the feedback as it relates to their project, decide on a course of action, and make an updated iteration.
Login
- Go to http://kelvinside.nuvustudio.com/
- Click on Login on the top right hand corner of the page

- Click on “Reset Password”
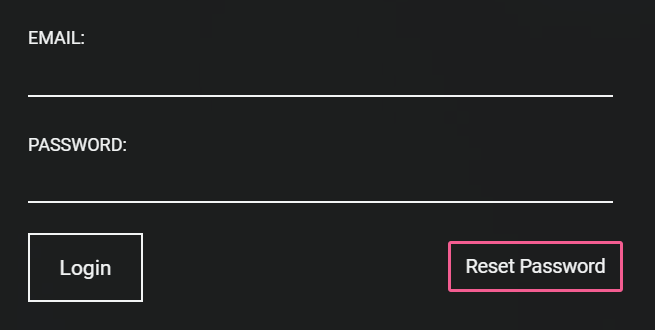
- Enter your email address
- You will get an email with instructions to reset your password (please be sure to check your JUNK folder if the email does not arrive)
- Click on the link and it will take you to a page where you can create a password.
- After creating a password, you will be logged in automatically.
Creating Posts
The site is post based. In general every post should have visual content. If you are posting a link to a website with images or a video, you should post some of the images directly onto the platform. The information below applies to all areas of content creation.
Note: You cannot combine photos and videos in a single post.
- Anytime you want to make a new post simply click inside the box where it says "CREATE A POST".

Adding Content to posts
- You can add text in the text box and use formatting options.

- Adding Images

- Use the Images icon to pick an image from your hard drive
- Use the Existing Images icon to pick an image from other posts in the current studio from or from another site. Using images from the current studio is vital for assembling weekly post summaries and presentations.
- To fetch images from another site, click on Existing Images , then From Another Site and enter the url. Not all sites are compatible with the fetcher, and images must have a minimum resolution of 500px in either direction.
- Use the Camera Icon to select images from the Photobooth. Photobooth images are automatically uploaded and will appear by date.
- Once your images are uploaded you can add captions or reorder images. Titles and captions will appear under the image in the post. This is a good tool for presentations and labels.
- Use the Embed icon to embed YouTube and Vimeo videos and other content. Copy the actual URL of the video or site you wish to embed, NOT the embed code.
- Use the Files icon to attach a PDF or other file types to your post. Do NOT upload images or videos as files.
- Use the Videos icon to add a video from your hard drive.
- Privacy Settings controls who can see the post. Privacy is generally defaulted to the School level.

- You can choose to disallow Comments if you wish. Comments are default allowed.

- Clicking on Notify Participants will send your post as an email to everyone in the studio or everyone in the project, depending on where the post resides. Coaches have the option for allowing or disallowing this checkbox, so you may not see it.

Editing Posts
After a post is published you can edit the post by clicking on the little gear icon on the top right hand side of the post. You can
- Click on Edit to edit the post text; add, reorder, title and caption images; or add new content.
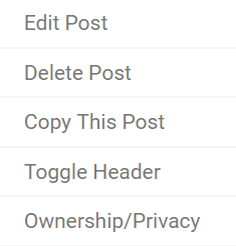
- Click on Delete to delete the post.
- Click on Copy to copy the post into memory. You can Paste the post anywhere you have rights to post bu clicking the four bars in the Studio menu and selecting Paste Post.
- Clock on Toggle Header to turn the header on and off.
- Click on Ownership & Privacy to Add Collaborators to the post. Collaborators are able to edit the post and add content. Only one person can edit the post at a time.